www.1howmany.com
Computers & Internet / How to Take a Screenshot on a Mac
How to Take a Screenshot on a Mac
Methods of Taking Screenshots on a Mac
Here they are:
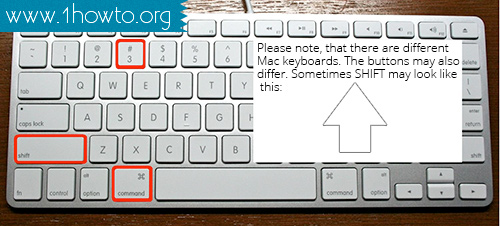
- If you need to get the picture of the whole desktop, just press <Command-Shift-3>. The screenshot is saved in PNG.
- A part of the desktop can be captured with the help of combination <Command-Shift-4>. You will have to select the necessary area by moving a cursor. It will be a PNG file too.
- A picture of an application window on a Mac is taken by <Command-Shift-4-Spacebar>. You will see the cursor in the form of a camera, which will highlight the window.
- You can also use the Grab utility, which can be found in Applications - Utilities. It has a user friendly interface, so you will not have any problems with it. There are four basic modes in the program: Selection (captures specific region), Window (takes the picture of the selected window), Screen (takes the whole screen), and Timed Screen (captures the screen after ten seconds).
- There are also many other convenient programs for taking screenshots on a Macintosh: Constrictor (Mac), TechSmith Snagit, iShowYou (Mac), Paparazzi (Mac), ScreenRecord (Mac), Screentool (Mac), etc.
These pieces of advice will help you to get better screenshots:
- Give preference to GIF2 format, because pictures in it compress and look better.
- Never reduce pixel dimensions.
- Before resizing GIF files, the mode should be converted to RGB.

You may be interested in:
Comments
